1. Nginx 서버 설치
명령어를 입력합니다.
설치가 잘되었는지 확인해보겠습니다.
명령어를 입력합니다.
아래 처럼 Installed: 1.14.0-0ubuntu1.7 이라고 뜨면 제대로 설치가 된 것입니다.
Installed: 1.14.0-0ubuntu1.7
Candidate: 1.14.0-0ubuntu1.7
Version table:
*** 1.14.0-0ubuntu1.7 500
500 http://ap-chuncheon-1-ad-1.clouds.archive.ubuntu.com/ubuntu bionic-updates/main amd64 Packages
500 http://security.ubuntu.com/ubuntu bionic-security/main amd64 Packages
100 /var/lib/dpkg/status
1.14.0-0ubuntu1 500
500 http://ap-chuncheon-1-ad-1.clouds.archive.ubuntu.com/ubuntu bionic/main amd64 Packages
2. iptables 규칙 초기화
3. 아이피주소로 접속해보기

공용 IP주소로 웹사이트에 접속하면 위와 같이 나옵니다.
4. Linux 폴더 권한 설정
sudo chgrp -R ubuntu /var/www
순서대로 명령어를 입력합니다.
5. PHP 7.4 설치하기
Press [ENTER] to continue or Ctrl-c to cancel adding it.
위 메시지가 나오면 ENTER를 누르시면 됩니다.
sudo apt-get install php7.4-fpm
7.0 또는 7.2를 설치하실 분들은 php7.0-fpm 또는 php7.2-fpm을 입력하시면 됩니다.
After this operation, 18.7 MB of additional disk space will be used.
Do you want to continue? [Y/n] Y
명령어가 좀 깁니다. 복사해서 붙여넣기 하시는걸 추천드립니다.
After this operation, 3509 kB of additional disk space will be used.
Do you want to continue? [Y/n] Y
php가 제대로 설치가 되었는지 확인합니다.
Copyright (c) 1997-2018 The PHP Group
Zend Engine v3.2.0, Copyright (c) 1998-2018 Zend Technologies
with Zend OPcache v7.2.33-1+ubuntu18.04.1+deb.sury.org+1, Copyright (c) 1999-2018, by Zend Technologies
이렇게 나오시면 제대로 설치가 된겁니다.
fpm 재시작 합니다.
6. default 사용자 권한변경
sudo chmod 664 /etc/nginx/sites-available/default
default파일 수정권한을 얻었으니 EditPlus로 수정해보겠습니다.
7. EditPlus 설정
일전에 설치 했던 PuTTY 실행파일 중에 pageant.exe를 실행합니다.
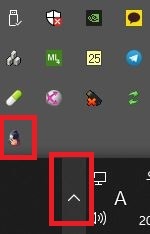
바로 창이 안뜨고 윈도우 작업표시줄 우측하단 실행중인 프로그램에 뜹니다.
찾아서 더블클릭 해주면 창이 뜹니다.
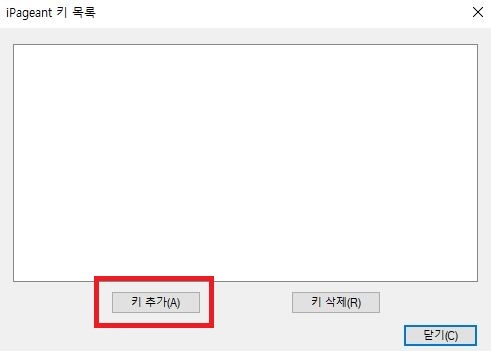
키 추가를 클릭해서 일전에 생성한 공용Key 파일을 추가해줍니다.
EditPlus를 다운로드 후 설치를 합니다.
https://www.editplus.com/kr/download.html
설치 후 EditPlus.exe 파일을 실행 합니다.
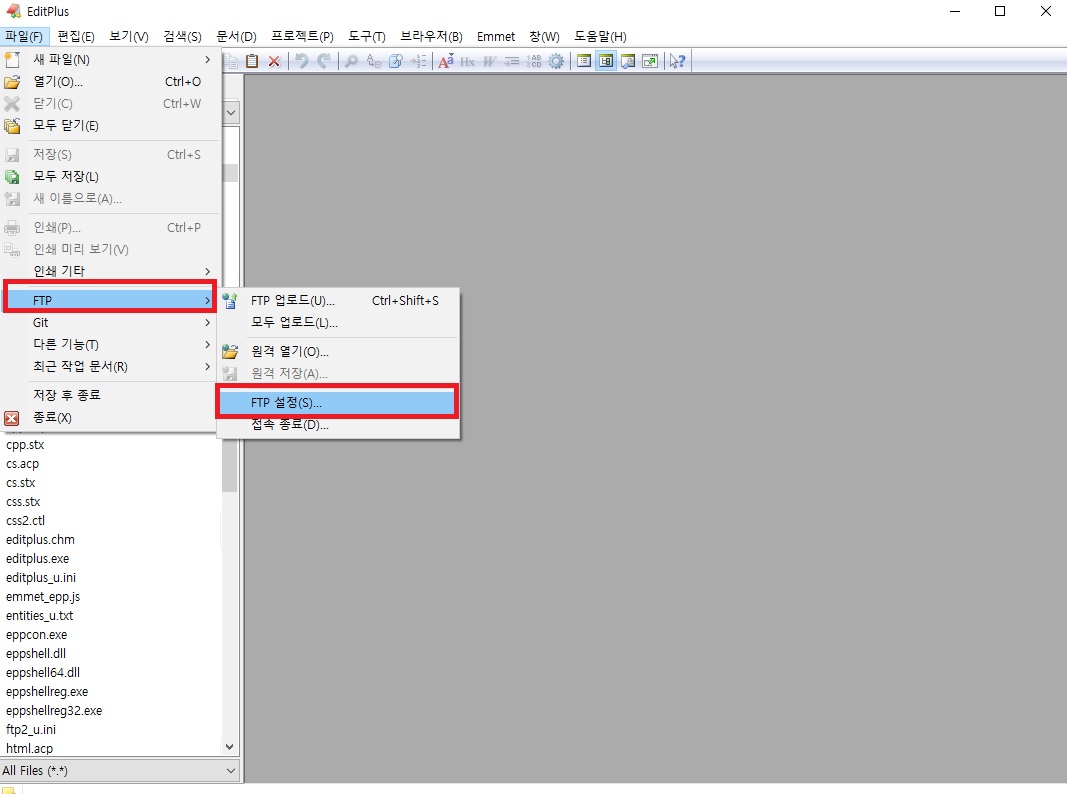
파일 > FTP > FTP 설정을 클릭합니다.
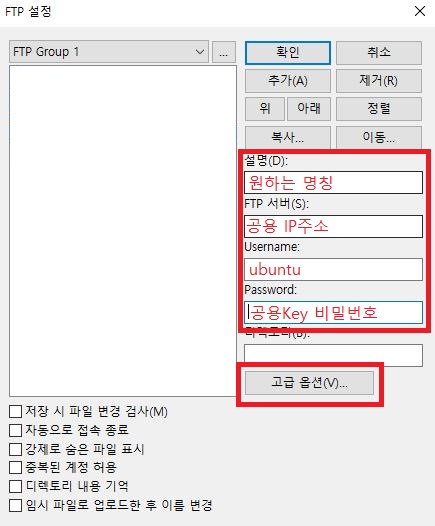
설명, FTP 서버, Username, Password를 작성 후 고급 옵션을 클릭합니다.
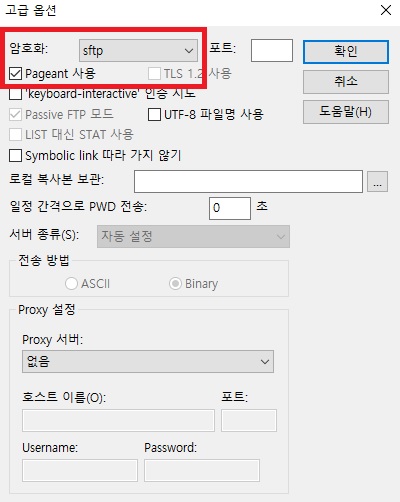
암호화: sftp
Pageant 체크 후 확인을 클릭합니다.
FTP 설정에서 '추가' 클릭 후 '확인'을 클릭합니다.
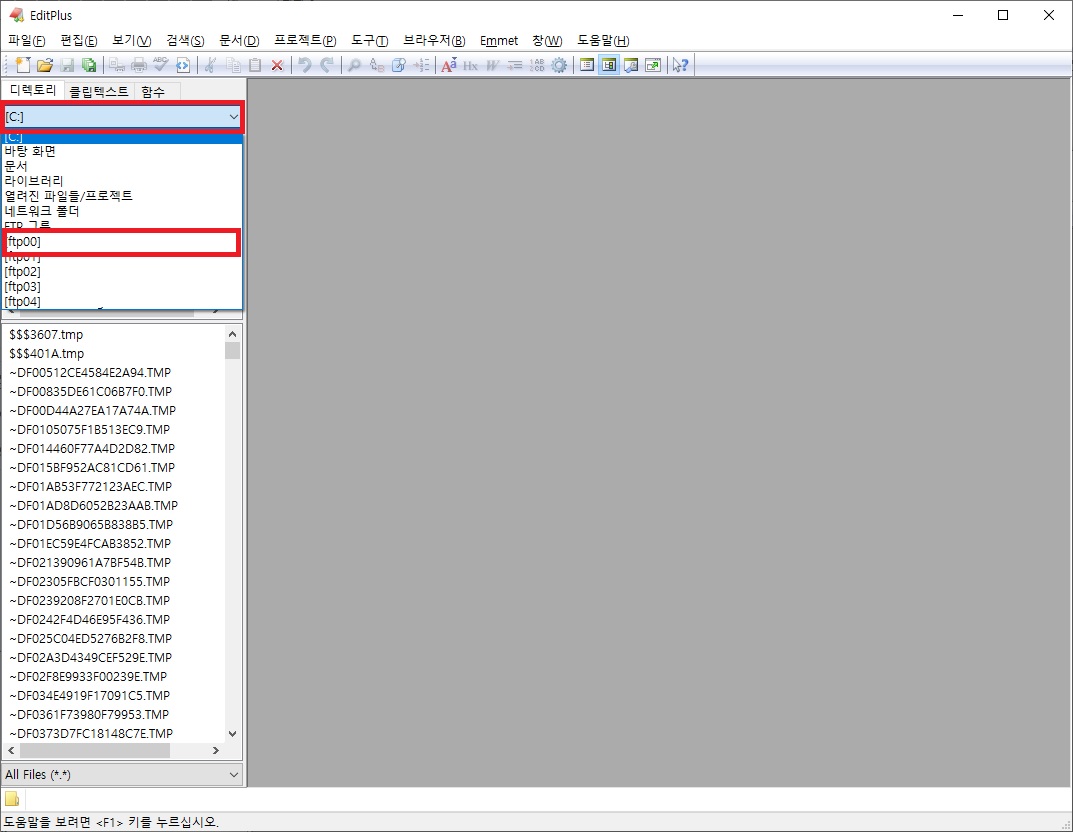
디렉토리에 방금 추가한 ftp를 클릭합니다.
팝업 메뉴가 뜨면 '예'를 클릭하시면 됩니다.
8. default 파일수정
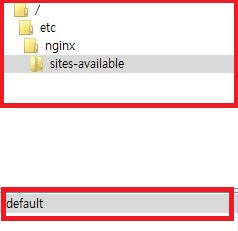
/etc/nginx/sites-available 경로에 default 파일을 더블클릭 합니다.
# You should look at the following URL's in order to grasp a solid understanding
# of Nginx configuration files in order to fully unleash the power of Nginx.
# https://www.nginx.com/resources/wiki/start/
# https://www.nginx.com/resources/wiki/start/topics/tutorials/config_pitfalls/
# https://wiki.debian.org/Nginx/DirectoryStructure
#
# In most cases, administrators will remove this file from sites-enabled/ and
# leave it as reference inside of sites-available where it will continue to be
# updated by the nginx packaging team.
#
# This file will automatically load configuration files provided by other
# applications, such as Drupal or Wordpress. These applications will be made
# available underneath a path with that package name, such as /drupal8.
#
# Please see /usr/share/doc/nginx-doc/examples/ for more detailed examples.
##
# Default server configuration
#
server {
listen 80 default_server;
listen [::]:80 default_server;
# SSL configuration
#
# listen 443 ssl default_server;
# listen [::]:443 ssl default_server;
#
# Note: You should disable gzip for SSL traffic.
# See: https://bugs.debian.org/773332
#
# Read up on ssl_ciphers to ensure a secure configuration.
# See: https://bugs.debian.org/765782
#
# Self signed certs generated by the ssl-cert package
# Don't use them in a production server!
#
# include snippets/snakeoil.conf;
root /var/www/html;
# Add index.php to the list if you are using PHP
index index.php index.html index.htm index.nginx-debian.html;
server_name _;
# Add index.php to the list if you are using PHP 아래쪽
44번째 줄 index 옆에 index.php를 추가합니다.
location ~ \.php$ {
include snippets/fastcgi-php.conf;
fastcgi_pass unix:/run/php/php7.4-fpm.sock;
fastcgi_param SCRIPT_FILENAME $document_root$fastcgi_script_name;
include fastcgi_params;
fastcgi_read_timeout 300;
}
location ~ /\.ht {
deny all;
}
# pass PHP scripts to FastCGI server 아래 보안코드를 추가하고 저장합니다.
9. Nginx 확인
다시 PuTTY로 돌아와서 sudo nginx -t 입력하여 Nginx에 문제 없는지 확인합니다.
nginx: configuration file /etc/nginx/nginx.conf test is successful
위와 같은 메시지가 뜬다면 Nginx가 정상적으로 작동하는 겁니다.
sudo service nginx restart
sudo iptables -F
Nginx를 재구동 해줍니다.
10. phpinfo 확인
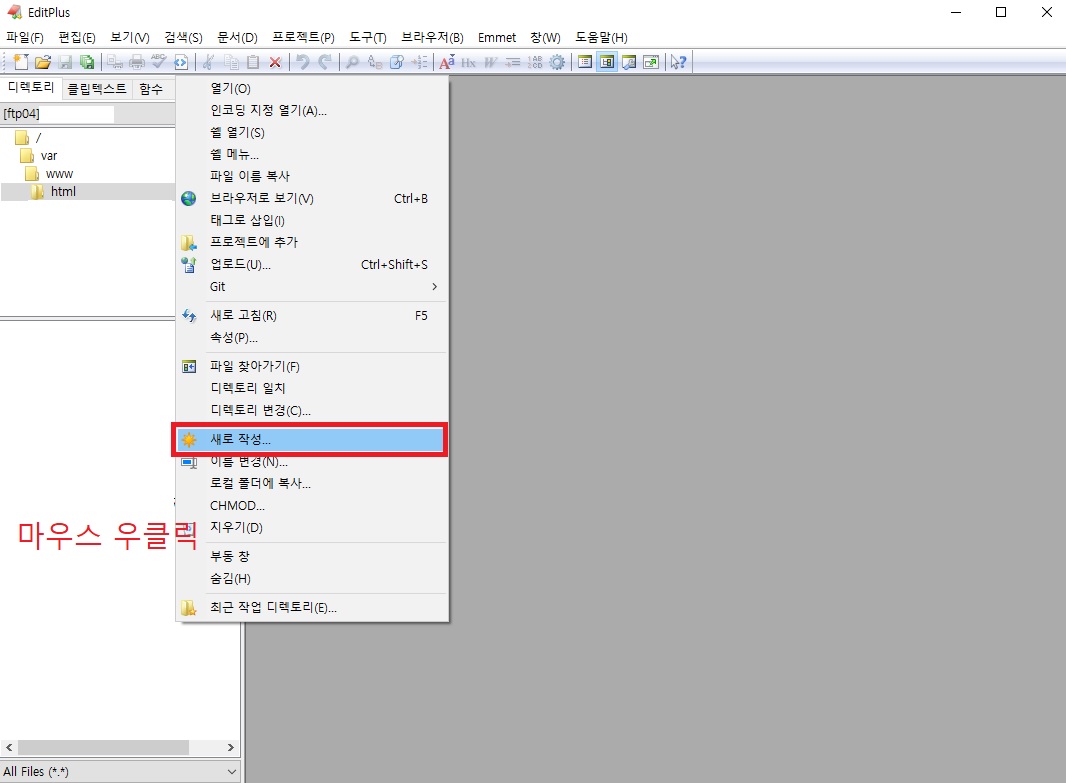
EditPlus에서 var/www/html 폴더에서 마우스 우클릭 후 새로 작성을 클릭합니다.
파일명을 index.php로 만듭니다.

빈 공간에 <?php phpinfo(); ?> 이렇게 작성 후 저장합니다.
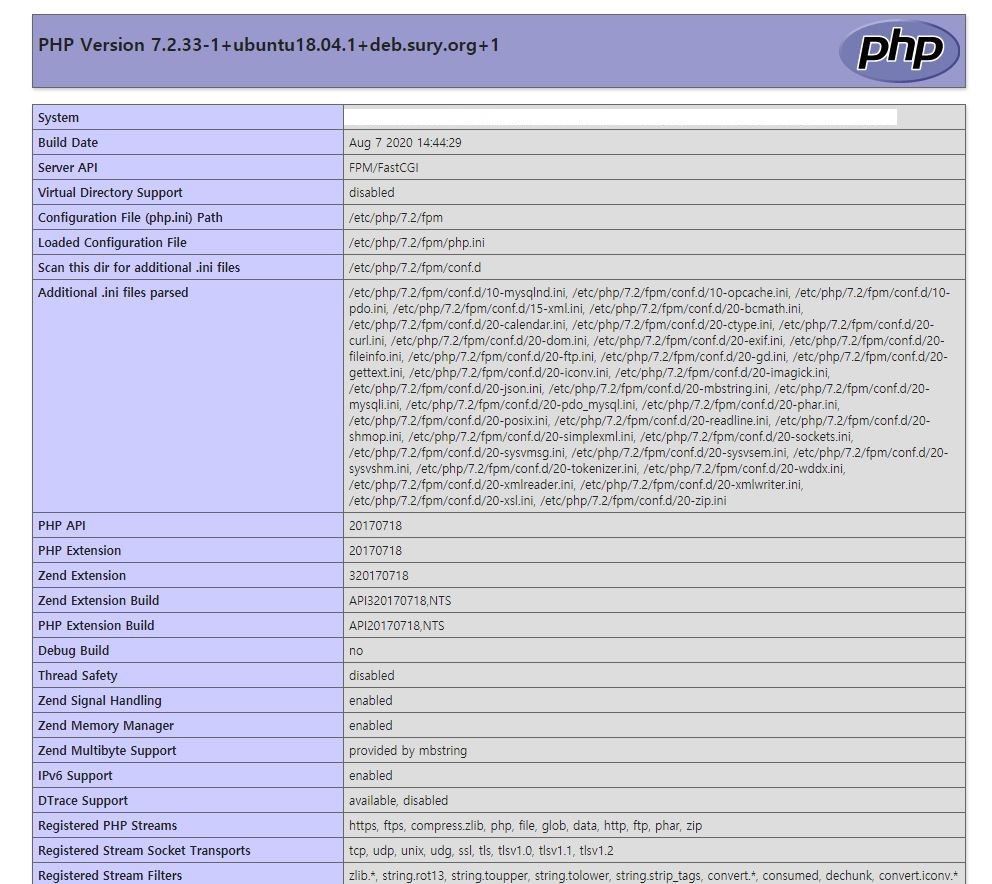
브라우저에 공용 IP주소를 입력 후 접속하면 PHP 정보를 확인 하실 수 있습니다.
11. PHP 시간 설정 변경
PuTTY로 돌아와서 위 명령어를 입력합니다.
(복사 후 마우스 우클릭하면 붙여넣기 됩니다.)

컨트롤+W 눌리고 검색화면에 date.timezone을 입력합니다.
; Defines the default timezone used by the date functions
; http://php.net/date.timezone
date.timezone = Asia/Seoul
;date.timezone = 부분에 앞에 ; 를 삭제합니다.
date.timezone = 뒤에 Asia/Seoul 을 입력합니다.
컨트롤+X 눌리고 Y 눌리고 ENTER를 눌립니다.
명령어를 입력 합니다.
동일하게 컨트롤+W 눌리고 검색화면에 date.timezone을 입력합니다.
;date.timezone = 부분에 앞에 ; 를 삭제합니다.
date.timezone = 뒤에 Asia/Seoul 을 입력합니다.
컨트롤+X 눌리고 Y 눌리고 ENTER를 눌립니다.
PHP를 재시작 합니다.
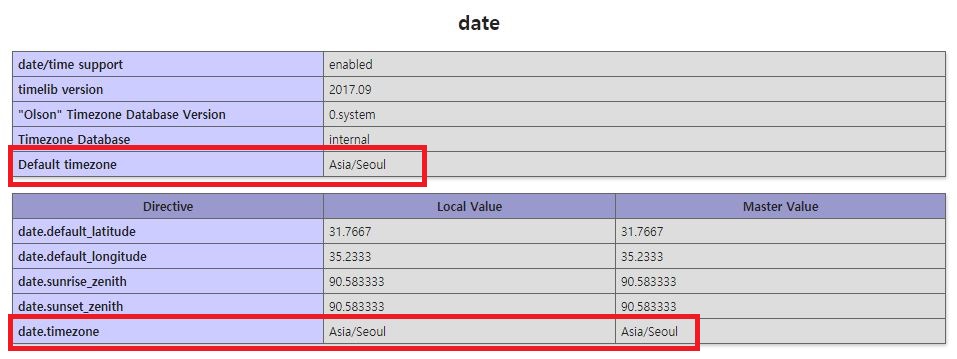
공용 IP주소로 접속하면 시간설정이 변경 된 것을 확인 할 수 있습니다.

 3. 오라클 클라우드에서 Ubuntu(우분투) 서버환경 설정


