
1. MariaDB 최신버전 설치하기
URL로 접속합니다.
https://downloads.mariadb.org/mariadb/repositories/#mirror=harukasan
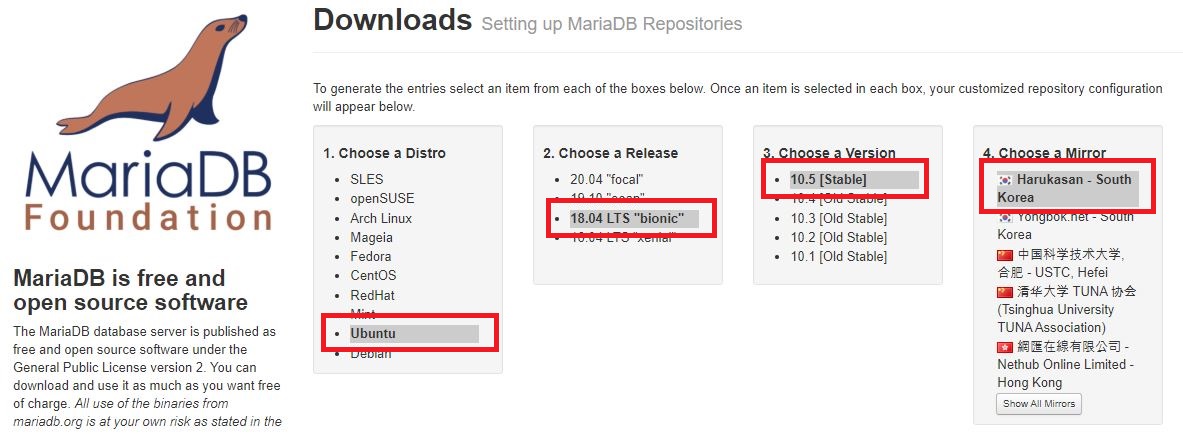
Ubuntu > 18.04 LTS "bionic" > 10.5 [Stable] > Harukasan - South Korea 를 선택합니다.
아래 쪽에 보면 설치방법이 나와 있습니다.
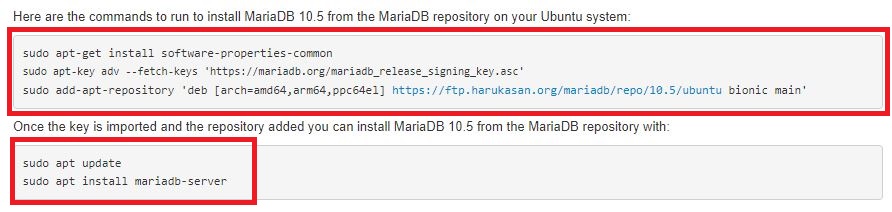
sudo apt-key adv --fetch-keys 'https://mariadb.org/mariadb_release_signing_key.asc'
sudo add-apt-repository 'deb [arch=amd64,arm64,ppc64el] https://ftp.harukasan.org/mariadb/repo/10.5/ubuntu bionic main'
sudo apt update
sudo apt upgrade
sudo apt install mariadb-server
차례로 명령어를 입력하여 설치를 합니다.
After this operation, 199 MB of additional disk space will be used.
Do you want to continue? [Y/n] Y
2. MariaDB 설치확인
명령어를 입력합니다.
Loaded: loaded (/lib/systemd/system/mariadb.service; enabled; vendor preset:
Drop-In: /etc/systemd/system/mariadb.service.d
└─migrated-from-my.cnf-settings.conf
Active: active (running) since Mon 2020-09-21 12:17:05 KST; 5 days ago
Docs: man:mariadbd(8)
https://mariadb.com/kb/en/library/systemd/
Main PID: 1303 (mariadbd)
Status: "Taking your SQL requests now..."
Tasks: 9 (limit: 1121)
CGroup: /system.slice/mariadb.service
└─1303 /usr/sbin/mariadbd
Active: active (running) 메시지가 뜨면 설치가 제대로 된 것입니다.
컨트롤+C 눌려서 빠져나옵니다.
3. MariaDB 비밀번호 설정
Enter current password for root (enter for none): Enter
Switch to unix_socket authentication [Y/n] N
Change the root password? [Y/n] Y
New password: 암호입력
Re-enter new password: 암호 재입력
Remove anonymous users? [Y/n] Y
Disallow root login remotely? [Y/n] N
Remove test database and access to it? [Y/n] Y
Reload Privilege tables now? [Y/n] Y
Thanks for using MariaDB! 메시지가 뜨면 완료 된 겁니다.
4. MariaDB 테이블 언어셋 기본값 설정
sudo nano /etc/mysql/conf.d/mariadb.cnf
명령어를 차례로 입력하면 nano 에디터가 뜹니다.
default-character-set=utf8mb4
[mysql]
default-character-set=utf8mb4
[mysqld]
collation-server = utf8mb4_unicode_ci
character-set-server = utf8mb4
collation_server = utf8mb4_unicode_ci
character_set_server = utf8mb4
복사하여 nano에디터 빈화면에 붙여넣기 합니다. (마우스 우클릭하면 붙여넣기 됨)
컨트롤+X 눌리고 Y 눌리고 ENTER를 눌러 저장합니다.
5. MariaDB 재시작
6. Ubuntu 재시작
Ubuntu 재시작 후 바로 SSH 접속이 안되니 2~3분 후 재접속 하시면 됩니다.
7. phpMyAdmin 설치하기
명령어를 입력하여 phpMyAdmin 압축파일을 다운받습니다.
압축을 풀어줍니다.
다운로드 받은 압축파일을 삭제합니다.
원하는 명칭은 phpmyadmin에 접근 가능한 경로가 됩니다.
iptables을 초기화 합니다.
http://공용 IP/원하는 명칭 으로 접속합니다.
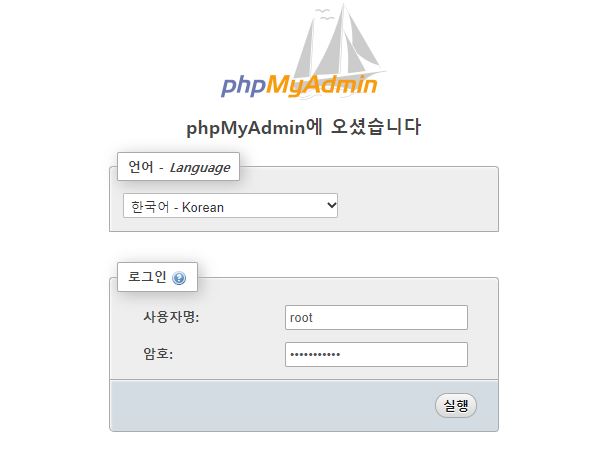
사용자명: root
암호: MariDB에서 설정한 비밀번호

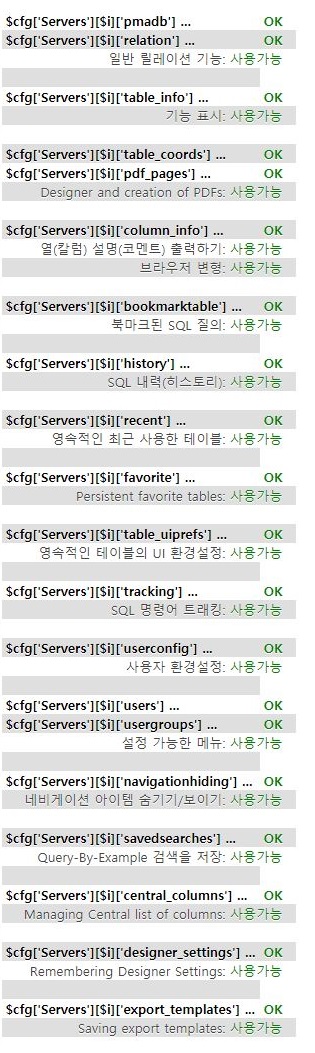
아래쪽에 3가지 에러메시지가 뜹니다.
여기 클릭 후 Create 클릭합니다.
OK 메시지가 뜹니다.
SSH에 명령어를 입력합니다.
아래 URL로 접속합니다.
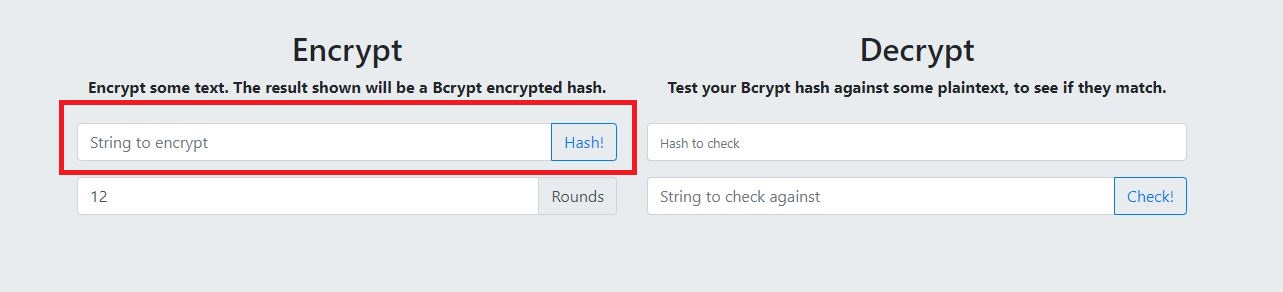
도메인 주소를 적고 Hash! 버튼을 클릭합니다.
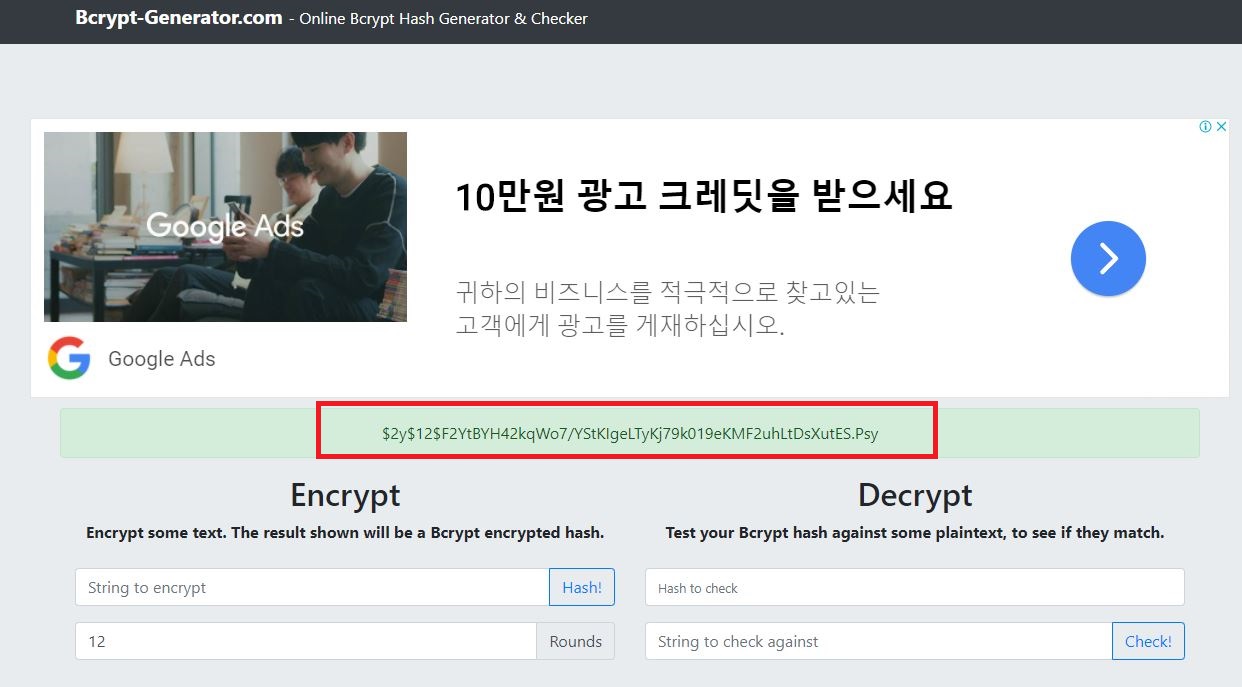
암호화 문자열을 복사합니다.
EditPlus로 config.inc.php 파일을 열기합니다.
var/www/phpMyAdmin-5.1.1-all-languages/config.inc.php
17번째줄에 암호화 문자열 넣는 곳에 암호화 문자열을 붙여넣기 후 저장합니다.
sudo chgrp www-data /var/www/phpMyAdmin-5.1.1-all-languages/tmp
sudo chmod 774 /var/www/phpMyAdmin-5.1.1-all-languages/tmp
SSH에서 명령어를 차례로 입력 후 phpMyAdmin에 다시 로그인하면 3가지의 에러메시지가 없어진걸 확인 할 수 있습니다.
 6. 도메인 연결 및 Nginx 라우팅 설정


